Sunday, December 22, 2013

Apply Balanced Optimization Principles in DataStage Job Design

DataStage v8.5 introduced an optional add-on: balanced optimizer. The optimizer can redesign parallel jobs to improve performance. It applies the following principles in the redesign.
Minimize I/O and data movement
Reduce the amount of source data read by the job by performing computations within the source database. Where possible, move processing of data to the database and avoid extracting data just to process it and write it back to the same database.
Maximize optimization within source or target databases
Make use of the highly developed optimizations that databases achieve by using local indexes, statistics, and other specialized features.
Maximize parallelism
Take advantage of default InfoSphere DataStage behavior when reading and writing databases: use parallel interfaces and pipe the data through the job, so that data flows from source to target without being written to intermediate destinations.
The key takeaway is to do as much as possible within databases. It seems to me that an experienced DataStage developer could do a much better job in applying these principles to optimize a job than a piece of software. So let me give it a try on a real-world production job.
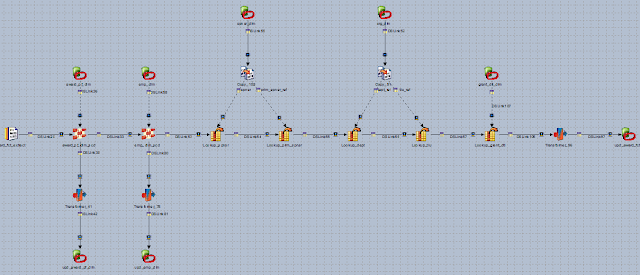
The original design is shown in Fig. 1. All data processing and transformation are performed within DataStage server, including,
  1. two slowly changing dimension stages,
  2. five lookup stages, and
  3. three transformer stages for adding timestamp columns.
Eight Oracle connector stages serve as data sources/targets only, reading 5 source tables and writing 3 target tables within the same database. No other tasks are performed within the connectors. This type of job is an ideal candidate for balanced optimization.

Figure 1: Original job design

The optimized job is shown in Fig. 2. A single Oracle connector stage replaces all 20 processing and data stages. The main data stream is bulk-loaded into a temp table (Fig. 3), and processed in after-SQL.
Figure 2: Redesigned job applying the principles of Balanced Optimization

Figure 3: Oracle connector configuration in the optimized job

Here are the after-SQL statements.


The performance gain is dramatic, dropping from ~30 seconds all the way down to ~3 seconds. In addition, I get two extra bonuses for free.

  1. The original job is not transactional. If it failed in the middle, the target tables might be in inconsistent states with partial results. In order to recover from the job failure, I need to do some cleanup. The optimized job, on the other hand, is transactional. The update to the target tables is carried out in the after-SQL statements. If they fail, the target tables are automatically rolled back.
  2. If the job fails because of data quality issues, such as lookup failure or unique constraint violation, it is not easy to find the offending rows in the original design. In the optimized design, all intermediate results are kept in the temp table within the same database as the target tables. It is fairly straightforward to pinpoint the offending rows by joining the temp and the target tables.
In conclusion, balanced optimization (BO) can greatly improve job performance, as well as simplify maintenance. However, it is not necessary to pay the additional license fee if the BO principles can been applied in job design by developers.

Saturday, December 21, 2013

Scrollable Table Control with Fixed Header

Introduction

ISD provides a scrollable table control for displaying a lot of rows in a window with fixed height. It lacks, however, the most desirable feature of a scrollable table: a fixed table header. Here is a screenshot and a demo page. The previous versions of ISD do have a fixed-header scrollable table control. But it only works in IE, not in Chrome or Firefox.
A scrollable table is, in my opinion, not a good UI design in the first place. It significantly slows down initial page load. The issue (or the header) can be easily fixed. If your client or manager asks for a scrollable table, try your best to steer them away from it. If you can't, then follow these steps to implement a fixed-header scrollable table.

Implementation

Step 1: Prepare a built-in scrollable table

Add a built-in scrollable table control onto your page. Split the merged header cell above row buttons. This is an important step. Any merged cell will screw up column width calculation while fixing the header row.

Step 2: Download JavaScript libraries

ISD has added out-of-box jQuery support in latest versions. If you still use old versions without jQuery, you can download it from jQuery website, and include it in master pages.
Another library is the jQuery Scrollable Table Plugin. Download it from its website, and put it under your project's root folder.

Step 3: Modify Styles.css

Add the following classes to the Styles.css file.

Step 4: Add JavaScript code to page prologue

Add the following JavaScript code to the page prologue.
Build and run.

Conclusion

Here is what you get on screen, and a demo page. Please note the long delay (~10 seconds) at initial page load, during which the table header appears not fixed. This endorses my previous suggestion: avoid scrollable tables as much as you can.

Friday, October 4, 2013

DataStage Batch Sparse Lookup

Introduction

DataStage sparse lookup is considered an expensive operation because of a round-trip database query for each incoming row. It is appropriate if the following 2 conditions met.
  1. The size of reference table is huge, i.e. more than millions of rows. If the reference table is small enough to fit into memory entirely, normal lookup is a better choice.
  2. The number of input rows is less than 1% of the reference table. Otherwise, use a Join stage.
Is it possible to speedup sparse lookup by sending queries to database in batches of 10, 20 or 50 rows? In other words, instead of sending the following SQL to database for each incoming row,
SELECT some_columns FROM my_table WHERE my_table.id_col = orchestrate.row_value
can we send one query for multiple rows like this?
 SELECT some_columns FROM my_table WHERE my_table.id_col in (orchestrate.row_value_list)

Solution

In order to make the 2nd query work, we need 2 tricks. First, we need to concatenate values from multiple rows into a single string, separated by a delimiter (e.g. comma). I am not sure how to do this in DataStage v8.1 or earlier. Not impossible, but rather complicated. Since v8.5, the Transformer stage has loop capability, which makes the task of concatenating multiple rows much easier.

The 2nd trick is to, at database side, split the value list from a comma-delimited string into an array. If we simply plug the original string into the 2nd query, the database will interpret it literally as a single value. If only there is a standard SQL function equivalent to string.split() in C# or Java. Different databases use their own tricks to achieve string.split(). I will use Oracle in my example implementation.

Implementation

Job overview

The example implementation generates 50k rows using a Row Generator stage. Each row has a key column and a value column. The rows are duplicated in Transformer_25. One copy is branched to Transformer_7, where multiple rows of the keys are concatenated. The number of rows in each concatenation is set by a job parameter, #BATCH_SIZE#. The concatenated keys are then sent to Lookup_0 for sparse lookup against an Oracle table with 5m rows. The lookup results are merged back to the original stream in Lookup_16.

Concatenate multiple rows in a Transformer loop

Define the following stage variables and loop condition to concatenate multiple rows.
Variable Data Type Derivation
BatchCount Integer IF IsLast THEN 1 ELSE BatchCount + 1
IsLast Bit LastRow() or BatchCount = BATCH_SIZE
FinalList String(4000) IF IsLast THEN TempList : DecimalToString(DSLink21.NUM_KEY,"suppress_zero") ELSE ""
TempList String(4000) IF IsLast THEN "" ELSE TempList : DecimalToString(DSLink21.NUM_KEY, "suppress_zero") : ","

Loop condition: @ITERATION = 1 and IsLast

Batch sparse lookup

The concatenated keys need to be split in the Oracle connector. Spliting a comma-delimited string in Oracle can be done using reqexp_substr() function and recursive query. For example,
SELECT regexp_substr('A,B,C', '[^,]+', 1, level) from dual connect by level <= regexp_count('A,B,C', ',') + 1
This is how to setup the query in the Oracle connector stage.

Test run

A test run with BATCH_SIZE of 50 is shown below. DSLink4 indicated that 1,000 queries, instead of 50,000, were sent to the database.


Performance Evaluation

Another job (shown below) using regular sparse lookup was compare the performance of batch sparse lookup.

The result of the comparison is summarized in the chart below. Batch sparse lookup can cut down job running time by ~75%. The most effective batch size is between 20 to 50.

Thursday, May 30, 2013

Generate Insert/Update Script for DataStage Oracle Connector Automatically

Here is an updated post.

For transactional (non-bulk) data load in DataStage using Oracle connectors, it is always the best option to use the "update then insert" mode. As shown in this post, the "update then insert" mode is as fast as the "insert then update" mode when it is 100% inserts, and outperform other modes when updates has higher percentage. Even if you know that the incoming data is 100% inserts, "update then insert" is still a better choice. Because your job may fail in the middle, and the data has been partially loaded. Now, if you restart the job, it is no longer 100% inserts.

In order to use the "update then insert" mode, you need to specify key column(s) in an Oracle connector stage, so that it knows which columns should be matched in where clause while generating update statement at run-time. Alternatively, you can provide insert/update statements yourself.

Writing insert/update statements by hand is tedious, especially if you have a lot of tables. The following SQL scripts generate insert/update statements automatically. You may paste the output into Oracle connector stages directly. Or you may wrap the scripts in a simple parallel job, and save the output into a text file. Use a sequence job to loop through hundreds of tables.

For update statement:
For insert statement:

Saturday, May 25, 2013

ISD Code Customization Tips, Part III: Avoid Reading QueryString Directly

Introduction


ISD makes it trivial to implement URL parameter encryption. All you need to do is to tick a checkbox in application generation options. This is extremely helpful in scenarios when you need to turn on/off the functionality in the middle of your development. For example, your client requests to add URL encryption at the last minute before you are ready to release the application. Another scenario is that you had encryption turned on from the beginning of your project. In order to track a tricky bug, you turned encryption off temporarily. After the bug was fixed, you turned encryption back on.

However, if you read URL parameters directly in your customization code, like this,
string companyId = Page.Request.QueryString["CompanyId"];
you lose all the flexibility and convenience ISD provides. That's because ISD adds/removes encryption-related code only in auto generated section II. It does not touch custom code in section I. Therefore, it is your responsibility to switch on/off encryption in section I.

Tip


In order to read URL parameters in section I custom code without losing the encryption on/off flexibility, you can use URL( ) formula function, like this,
string companyId = EvaluateFormula("URL(\"CompanyId\")");
Formula function URL( ) automatically decrypts parameters if URL encryption is turned on. 

Thursday, May 23, 2013

Age Calculation: Oracle vs. SQL Server

Oracle months_between(sysdate, dob)/12
SQL server year(getdate()) - year(dob) + (month(getdate()) - month(dob))/12.0 + (day(getdate()) - day(dob))/365.0

If you are only interested in the integer part of the age, here is an alternative method  for SQL server:
(cast(convert(varchar(8), getdate(), 112) as int) - cast(convert(varchar(8), dob, 112) as int))/10000

Tuesday, May 21, 2013

DateDiff: Oracle vs. SQL Server

Introduction

Oracle and SQL server are very different on calculating the difference between two dates, both syntactically and semantically. The following table summarizes their differences.
Syntax Semantics
Oracle date2 - date1 Time elapsed from date1 to date2 measured in days.
SQL Server datediff(unit, date1, date2) The number of date/time boundaries crossed from date1 to date2.

The SQL server's semantics is best demonstrated with the following example.

In both cases, the time elapsed is the same, 10 seconds. But the boundary counts are different. Be careful about the semantic difference. Make sure what you calculate is what you want.

Now it begs the question: how to calculate boundaries crossed in Oracle or time elapsed in SQL server.

Boundaries crossed in Oracle

First, use trunc() function to align dates to their boundaries. Then calculate the difference. For example,

Time elapsed in SQL server

Use second boundaries crossed as an approximation to seconds elapsed. Then convert it to other unit. For example,


Monday, May 20, 2013

Automatically Create DataStage Schema Files

Introduction

Loading a csv file to a database table is one of the simplest DataStage tasks. Using Runtime Column Propagation (RCP), a single parameterized job can handle multiple files. Here is a step-by-step tutorial to do just that: Guidelines to Develop a Generic Job using Schema Files. For each csv file, DataStage needs a schema file to load column information at runtime. In the tutorial, a sample schema file is created by hand. If there are dozens of csv files to be loaded, creating all those schema files manually is quite tedious. Since every csv file is mirrored in a database table, it is possible to let DataStage collect column information from the database automatically. I will show you 3 approaches in this post.

Semi-Automated Solution

The first solution is semi-automatic, using DataStage's Import Table Definition wizard. In DataStage designer, click menu item Import / Table Definitions / Orchestrate Schema Definitions, and then select Database table (via orchdbutil) option. Type in database connection info, and select the table to be imported. In the next step, DataStage reads column information from the database, and displays it in the schema file format, as shown below. 

Copy and paste the columns to a schema template. The template contains other format information, such as field and record delimiters. Save it to a new text file, and this table is done. Go back to the previous step, select another table, and repeat.
This approach works well on a handful of tables. If there are a lot more tables, or table structures change frequently, a fully automated approach is more desirable.

Fully Automated Solution 1

As revealed in the previous approach, the DataStage import wizard uses a command-line application (orchdbutil) to generate the schema under the hood. If you have access to the DataStage server and are comfortable with shell scripting or other scripting language, you can write a script to loop through table names in an input file, feed the table to orchdbutil, and parse its output. I am not going to get into the details. Here is a blog post that can help you get started: Importing Table Definitions With OrchDbUtil.

Fully Automated Solution 2

Another fully automated approach takes advantage of DataStage itself. Create a parallel job to read schema  through an Oracle connector using a custom SQL statement, and save it to a sequential file. Create a sequence job to loop through a list of tables. Below is a sample implementation of the parallel job, the SQL statement and the sequence job.


Tuesday, April 30, 2013

Performance Comparison of Upsert Options in DataStage Oracle Connector

DataStage Oracle connector stage can write data to database in UPSERT mode. Actually, there are 2 UPSERT modes, "Insert then update" and "Update then insert", as described below:
Write modeDescription
Insert then updateFor each input record, the connector first tries to insert the record as a new row in the target table. If the insert operation fails because of a primary key or unique constraint, the connector updates the existing row in the target table with the new values from the input record.
Update then insertFor each input record, the connector first tries to locate the matching rows in the target table and to update them with the new values from the input record. If the rows cannot be located, the connector inserts the record as a new row in the target table.
From the description, it's no-brainer to select a write mode if you know the majority of input records are inserts or updates. What about 50/50, or unpredictable input? Is it worthwhile to split the input records into pure inserts and pure updates? To answer the questions, I did some tests. The result is summarized in the following graph.

The result is surprising. "Update then insert" mode is always the fastest no matter what percentage of input is update. It makes life much easier. No more splitting stream. No more picking the correct mode. It is always "Update then insert."

Note: The test was done in DataStage v8.7.

Saturday, March 30, 2013

Remove COR sidebar

Drag this link to your browser's bookmarks bar: Remove Sidebar

Login your COR account, and click the bookmark.

Wizard of COR (Call of Roma)

The best dummy loader and auto farmer for Call of Roma. Period.

Features:
  1. Troop loading
    • Load single or multiple (up to 12) heroes with 1 mouse click.
    • Unlimited number of pre-defined troop configurations.
  2. Luxury hunting
    • Launch single or multiple (up to 9) heroes to maraud a wild.
    • Automatic protective retreat.
    • Automatic bread.
    • Unlimited number of hits as long as there are enough physicals (bread) and troops.
  3. Automatically adjust to different screen sizes (resolutions).
  4. Support multiple browsers
    • Extensively tested in IE.
    • Lightly tested in Firefox and Opera.
    • Does not work in Chrome.
Installation:
  1. Download it here.
  2. Unzip it to an empty folder. You will see 2 files: WizardOfCOR.exe and troops.xml.
  3. Done.
How to use:
  1. Start/hide/unhide/exit
    • Double-click WizardOfCOR.exe to start the wizard. 
    • Click "X" button at the upper-right corner to hide the wizard into the icon tray ("H"). 
    • Press win+t (window key and "t" at the same time) to unhide the wizard.
    • To exit the wizard, right-click "H" icon in the icon tray and then left-click "Exit".
  2. Load troop
    • Open a hero in "Transfer" tab.
    • Select troop types and type in counts for 6 divisions. You may type "max" in one of the divisions. Alternatively, you can select a pre-defined setup.
    • Click "Load Single" to load the current active hero.
    • Click "Load" to load multiple heroes.
    • Click "Save" to save any changes to the selected pre-defined setup.
    • You can edit troops.xml in any text or xml editor to add new setups or modify existing ones. There is no limit on the number of setups.
  3. Maraud wilds
    • The wizard can launch multiple marauds in tandem on the same wild. One hero per maraud. No dummies.
    • Gear and load up to 9 heroes. Line them up in the lower-right window. The first hero must be at the top-left corner.
    • Click the wild, and click "maraud". This will open the hero panel on "Expedition" tab, and save the wild in "Target".
    • Type Expedition Transit Time (ETT) in the wizard. Set other parameters in the wizard. Click "Go".
    • To use auto bread, heroes must have 150 physicals, i.e. level 100+.
    • There is no limit on how many rounds you can type in the box. However, if the heroes have insufficient physicals, or there is no more bread left under "Auto bread" mode, COR will prevent the heroes from launching. Every hit wears down heroes' troops. The wizard doesn't replenish troops. So you need to make sure that the loaded troops can sustain the rounds of hits.
  4. Pause/resume/stop
    • Press Ctrl+Alt+p to pause whatever the wizard is doing.
    • Press Ctrl+Alt+p again to resume where it was left.
    • Press Esc to stop and reset the wizard.
  5. Match screen
    • The "Match screen" button on the "Maraud" tab is to check whether the wizard correctly detect COR window's size and position. If it does, a translucent window should tightly cover COR. Otherwise, the translucent window will cover the entire screen.
    • If the wizard cannot detect COR window correctly, try another browser or change screen resolution.